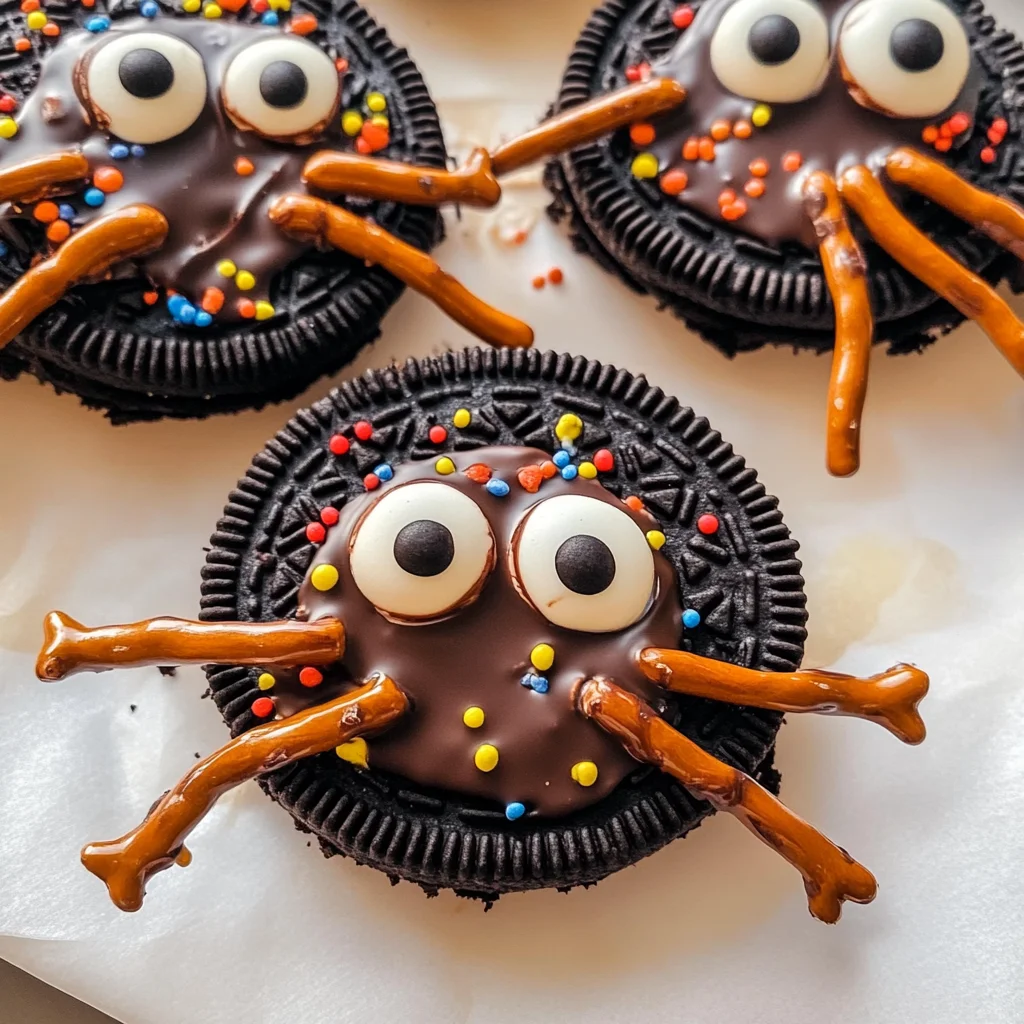
Oreo Spider Halloween Cookies
Get into the spooky spirit with these Oreo Spider Halloween Cookies! These delightful treats are perfect for Halloween parties, classroom celebrations, or just a fun afternoon with the kids. Not only do they look adorable, but they also combine the classic taste of Oreos with a creative twist that’s sure to impress. The combination of chocolate and candy eyes makes them irresistible, while their easy preparation means you can whip them up in no time!
Why You’ll Love This Recipe
- Fun for Kids: Making these cookies is an enjoyable activity for children, letting them get creative with decorating.
- Quick Preparation: With just 20 minutes of prep time, you can have these delicious treats ready in no time.
- Visually Appealing: The spooky spider design adds a festive touch to your Halloween spread.
- Customizable: You can easily adjust decorations or ingredients based on your preferences or dietary needs.
- Perfect for Parties: These cookies are a hit at any Halloween gathering, adding both flavor and fun.

Tools and Preparation
To create these Oreo spider Halloween cookies, you’ll need a few essential tools. Having the right equipment makes the process smoother and more enjoyable.
Essential Tools and Equipment
- Mixing bowl
- Microwave-safe container
- Baking sheet
- Parchment paper
Importance of Each Tool
- Mixing bowl: A sturdy bowl ensures you can mix ingredients thoroughly without spills.
- Microwave-safe container: This allows safe melting of chocolate without burning it.
- Baking sheet: Useful for laying out your finished cookies as they cool.
- Parchment paper: Prevents sticking and makes cleanup easier.
Ingredients
Gather these ingredients to make your Oreo spider Halloween cookies:
For the Cookies:
- 1/2 cup chocolate chips (dairy free)
- 1 teaspoon coconut oil
- 12 Oreo cookies (Halloween kind or double stuffed)
- 36 pretzel sticks
- 12 dozen small candy eyeballs
- 3 tablespoons sprinkles
How to Make Oreo Spider Halloween Cookies
Step 1: Melt the Chocolate
- To a small bowl, add 1/2 cup of chocolate chips and 1 teaspoon of coconut oil.
- Microwave the mixture for one minute or until fully melted, stirring to combine.
Step 2: Prepare the Oreos
- Break 3 pretzel sticks in half.
- Twist each Oreo cookie to remove the top wafer (the blank side).
- Press the pretzel stick halves into the cream side of the Oreo.
- Pour 1/2 teaspoon of melted chocolate on top of the pretzel legs.
- Press the ‘blank’ Oreo wafer back on top of the pretzel legs.
Step 3: Decorate Your Cookies
- Dip one side of each cookie into the melted chocolate.
- Place a couple of candy eyes on top and sprinkle with sprinkles.
Step 4: Set and Enjoy
- Refrigerate the cookies for at least 10 minutes or until the chocolate hardens.
- Once set, serve them up and enjoy your spooky treats!
How to Serve Oreo Spider Halloween Cookies
Serving Oreo spider Halloween cookies is all about creativity and fun! These spooky treats can be the highlight of your Halloween gathering or a delightful surprise for kids. Here are some ideas on how to serve them.
Individual Treat Bags
- Create mini treat bags filled with Oreo spider cookies. Tie them with a festive ribbon for an adorable party favor.
Halloween Dessert Table
- Arrange the cookies on a themed dessert table alongside other spooky sweets. Use black and orange decorations to enhance the Halloween vibe.
Spooky Cookie Platter
- Serve the cookies on a large platter surrounded by fake cobwebs and plastic spiders for an extra creepy touch.
Trick-or-Treat Stations
- Set up a station for trick-or-treaters with these cookies. Let kids take their own as they enjoy the Halloween festivities in your neighborhood.
Costume Party Snack
- Incorporate these cookies into your costume party snack spread. They’ll be a hit with both kids and adults alike!
How to Perfect Oreo Spider Halloween Cookies
To ensure your Oreo spider Halloween cookies turn out amazing every time, consider these helpful tips.
- Use fresh ingredients: Make sure your chocolate chips and Oreos are fresh for the best taste.
- Melt chocolate slowly: Heat chocolate chips in short intervals to avoid burning them. Stir well for a smooth texture.
- Customize decorations: Feel free to use different colored sprinkles or edible glitter for extra flair.
- Chill properly: Allow enough time for the chocolate to harden in the fridge, ensuring they hold their shape when served.
- Experiment with flavors: Try using flavored Oreos, like mint or pumpkin spice, for a fun twist.
- Involve the kids: Let children help decorate the cookies; it makes the process more fun and creative!
Best Side Dishes for Oreo Spider Halloween Cookies
Pairing side dishes with your Oreo spider Halloween cookies can enhance your Halloween spread. Here are some delicious options that complement these spooky treats.
- Pumpkin Soup – A warm, creamy soup perfect for fall gatherings; serve it in mini pumpkin bowls for extra charm.
- Ghostly Guacamole – Whip up guacamole and shape it into ghost figures, served with tortilla chips for dipping.
- Witch’s Brew Punch – A refreshing drink made from lime sherbet and lemon-lime soda; serve in cauldrons or spooky cups.
- Mummy Dogs – Hot dogs wrapped in crescent roll dough, baked until golden brown, giving them a mummy-like appearance.
- Bat Wings – Chicken wings coated in a dark sauce; they look eerie but taste delicious!
- Spider Veggie Tray – Create a veggie platter arranged like a spider web, using cucumbers, carrots, and dip in the center.
- Frankenstein Fruit Kabobs – Colorful fruit skewers topped with green melon balls that resemble Frankenstein’s head.
- Creepy Cheese Platter – An assortment of cheeses shaped into bats and pumpkins; serve with crackers for crunch!
Common Mistakes to Avoid
Making Oreo Spider Halloween Cookies can be a fun experience, but avoiding common pitfalls is key to success.
- Ignoring ingredient quality: Always use fresh ingredients for the best flavor. Old or stale cookies and chocolate can ruin your treats.
- Skipping the cooling time: Allowing the cookies to chill in the fridge helps the chocolate harden properly. Skipping this step may lead to messy results.
- Overloading on decorations: While sprinkles and candy eyes are fun, using too much can overwhelm the cookie’s taste. A few strategically placed items work best.
- Not breaking pretzels correctly: Ensure pretzel sticks are broken evenly to make them look like spider legs. Uneven pieces can affect how they attach to the Oreo.
- Forgetting about allergies: Check for dietary restrictions among your guests. Offer alternatives like gluten-free Oreos or dairy-free chocolate for inclusive fun.
Storage & Reheating Instructions
Refrigerator Storage
- Store in an airtight container for up to 5 days to keep them fresh.
- Place parchment paper between layers of cookies to prevent sticking.
Freezing Oreo Spider Halloween Cookies
- Freeze in a single layer on a baking sheet before transferring to a freezer-safe container.
- They can last up to 3 months in the freezer without losing flavor.
Reheating Oreo Spider Halloween Cookies
- Oven: Preheat oven to 350°F (175°C). Warm cookies for about 5 minutes.
- Microwave: Heat one cookie at a time for about 10-15 seconds on medium power.
- Stovetop: Place cookie in a skillet over low heat for about 1 minute, just until warm.
Frequently Asked Questions
Oreo Spider Halloween Cookies are not only fun but also raise some common questions among bakers.
Can I use regular Oreos instead of Halloween ones?
Yes, regular Oreos work just as well! The Halloween version adds a festive touch but isn’t necessary for flavor.
How can I customize my Oreo Spider Halloween Cookies?
Feel free to experiment with different toppings like edible glitter or colored drizzle. You could even add different candy types!
What can I substitute if I don’t have chocolate chips?
You can use white chocolate chips or even carob chips as an alternative. Just melt them down similarly with coconut oil.
How long do these cookies last?
When stored correctly, these cookies stay fresh in the fridge for about 5 days and up to 3 months if frozen.
Final Thoughts
These Oreo Spider Halloween Cookies are perfect for any spooky gathering or fun activity with kids. Their versatility allows you to customize them with your favorite toppings or adjust ingredients based on dietary needs. Give them a try and bring some joy and creativity into your Halloween festivities!
Oreo Spider Halloween Cookies

Get ready for a spooktacular treat with these Oreo Spider Halloween Cookies! Perfect for Halloween parties, classroom celebrations, or a fun family activity, these cookies combine the beloved taste of Oreos with a creative twist. With their adorable spider design made from pretzel legs and candy eyes, they are sure to impress everyone. Plus, the easy preparation means you can make them quickly—ideal for those last-minute festivities!
- Prep Time: 20 minutes
- Cook Time: 0 minutes
- Total Time: 20 minutes
- Yield: Makes approximately 12 cookies 1x
- Category: Dessert
- Method: Baking
- Cuisine: American
Ingredients
- 1/2 cup chocolate chips (dairy-free)
- 1 teaspoon coconut oil
- 12 Oreo cookies (Halloween-themed or regular)
- 36 pretzel sticks
- 12 small candy eyeballs
- 3 tablespoons sprinkles
Instructions
- Melt the chocolate chips and coconut oil together in a microwave-safe bowl for about one minute, stirring until smooth.
- Twist each Oreo to remove the top wafer. Insert three pretzel stick halves into the cream side as spider legs, secure with melted chocolate.
- Replace the top wafer and dip one side of the cookie into melted chocolate. Add candy eyes and sprinkles for decoration.
- Chill in the refrigerator for at least 10 minutes until set before serving.
Nutrition
- Serving Size: 1 cookie (30g)
- Calories: 150
- Sugar: 10g
- Sodium: 90mg
- Fat: 7g
- Saturated Fat: 3g
- Unsaturated Fat: 4g
- Trans Fat: 0g
- Carbohydrates: 20g
- Fiber: 1g
- Protein: 1g
- Cholesterol: 0mg