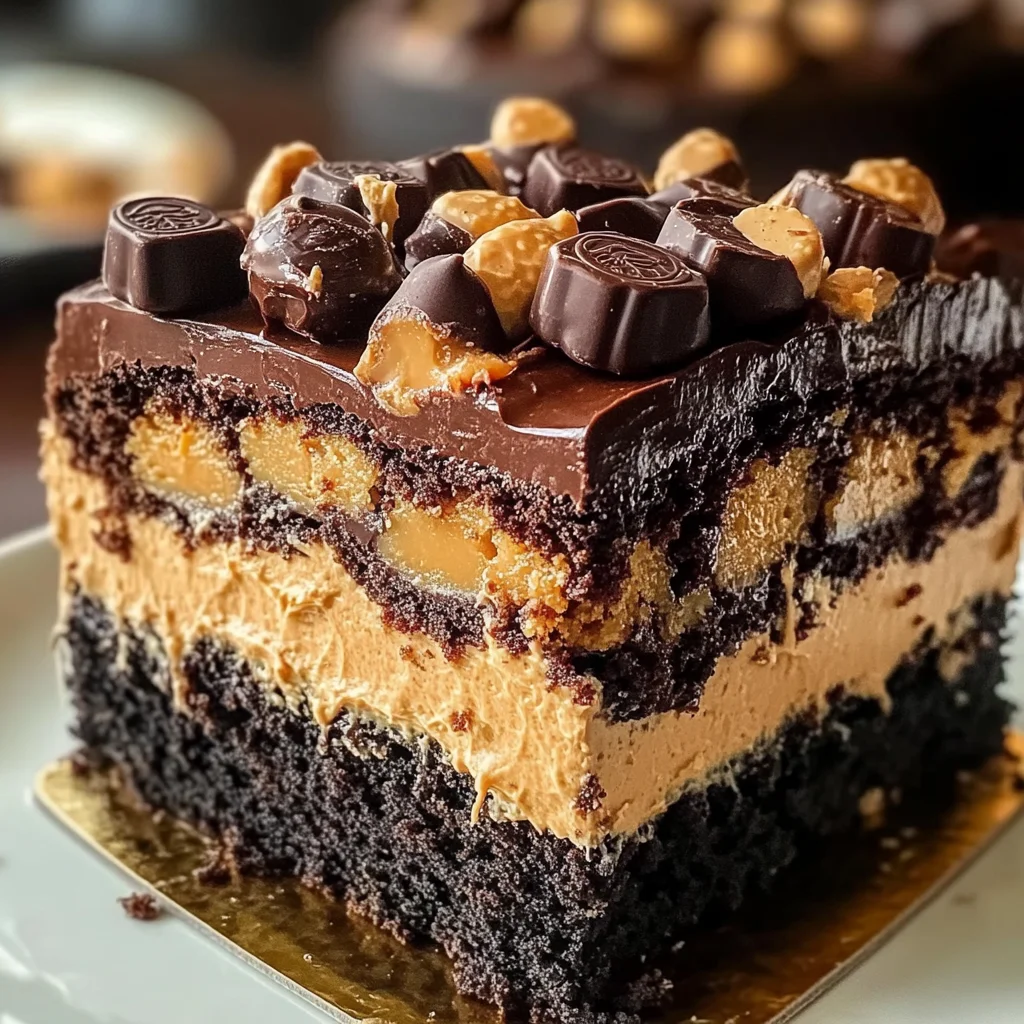
Reese’s Peanut Butter Earthquake Cake
A Reese’s Peanut Butter Earthquake Cake is the perfect dessert for any occasion. This decadent chocolate and peanut butter cake features a gooey, layered center and is topped with chopped Reese’s cups, making it a rich and indulgent treat. Whether you’re celebrating a birthday, hosting a gathering, or simply craving something sweet, this cake will impress everyone with its unique flavors and textures.
Why You’ll Love This Recipe
- Decadent Flavor: The combination of chocolate and peanut butter creates an irresistible taste that satisfies your sweet tooth.
- Easy to Make: With simple ingredients and straightforward steps, this cake comes together quickly without any fuss.
- Gooey Center: The creamy peanut butter layer adds a delightful surprise in every bite, making each piece unique.
- Versatile Occasions: Perfect for parties, potlucks, or family dinners; this cake will be the star of any dessert table.
- Kid-Friendly: Kids will love the fun flavors and the chance to help make this delicious treat!
Tools and Preparation
Before diving into the recipe, gather your tools and equipment. Having everything ready ensures a smooth baking experience.
Essential Tools and Equipment
- Mixing bowls
- Electric mixer
- Measuring cups
- Baking dish (9×13-inch)
- Rubber spatula
- Knife
Importance of Each Tool
- Mixing bowls: Essential for combining ingredients efficiently without mess.
- Electric mixer: Makes whipping up the batter quick and easy, ensuring a light texture.
- Baking dish: A sturdy dish is crucial for even baking and easy serving.
Ingredients
For the Cake
- 1 box chocolate cake mix
- 1 cup water
- 1/2 cup vegetable oil
- 3 large eggs
For the Peanut Butter Layer
- 1 cup creamy peanut butter
- 8 oz cream cheese, softened
- 1/2 cup unsalted butter, melted
- 4 cups powdered sugar
- 1 tsp vanilla extract
Topping
- 1 cup Reese’s Peanut Butter Cups, chopped
How to Make Reese’s Peanut Butter Earthquake Cake
Step 1: Preheat the Oven
Preheat your oven to 350°F (175°C) and grease a 9×13-inch baking dish to prepare for pouring in the cake batter.
Step 2: Prepare the Cake Batter
In a large bowl, mix together the chocolate cake mix, water, vegetable oil, and eggs until well combined. Pour this rich batter into your prepared baking dish.
Step 3: Make the Peanut Butter Mixture
In another bowl, combine the creamy peanut butter, softened cream cheese, melted butter, powdered sugar, and vanilla extract. Mix these ingredients until smooth for a delicious filling.
Step 4: Combine Layers
Drop spoonfuls of the peanut butter mixture over the chocolate cake batter. Use a knife to swirl the peanut butter mixture into the batter gently.
Step 5: Add Toppings
Sprinkle the chopped Reese’s Peanut Butter Cups evenly over the top of your cake for extra sweetness.
Step 6: Bake to Perfection
Bake in your preheated oven for about 35-40 minutes. Check if it’s done by inserting a toothpick into the center; it should come out mostly clean.
Step 7: Cool and Serve
Allow your cake to cool slightly before serving. Enjoy it warm or at room temperature for an indulgent treat!
How to Serve Reese’s Peanut Butter Earthquake Cake
Reese’s Peanut Butter Earthquake Cake is a delightful treat that can be enjoyed in various ways. Whether you prefer it warm or cold, there are several serving suggestions to enhance its rich flavors.
Warm with Ice Cream
- Serve slices of the cake warm alongside a scoop of vanilla ice cream for a delicious contrast of temperatures.
Topped with Whipped Cream
- Add a dollop of whipped cream on top for an extra creamy texture that complements the chocolate and peanut butter layers.
Drizzled with Chocolate Sauce
- A light drizzle of chocolate sauce adds an indulgent touch, intensifying the chocolate flavor in every bite.
Paired with Fresh Berries
- Fresh strawberries or raspberries provide a refreshing balance to the richness of the cake, making each bite more vibrant.
As a Layered Dessert
- Layer pieces of cake with whipped cream and berries in a glass for an attractive dessert presentation that’s perfect for gatherings.
Garnished with Chopped Nuts
- Sprinkling chopped peanuts on top adds extra crunch and enhances the nutty flavors of the cake.
How to Perfect Reese’s Peanut Butter Earthquake Cake
Perfecting your Reese’s Peanut Butter Earthquake Cake can elevate it from great to extraordinary. Follow these tips for the best results.
-
Choose Quality Ingredients: Using high-quality cocoa powder and peanut butter will enhance the overall flavor of your cake.
-
Don’t Overmix: Mix ingredients just until combined to keep the cake tender and prevent it from becoming tough.
-
Swirl Gently: When blending in the peanut butter mixture, swirl gently to create beautiful marbled patterns without fully mixing.
-
Use Room Temperature Ingredients: Ensure your eggs and cream cheese are at room temperature for easier mixing and better texture.
-
Check Doneness Carefully: Use a toothpick to check doneness. It should come out mostly clean, as some moistness is desirable for this cake.
-
Let It Cool Before Serving: Allowing the cake to cool slightly before serving helps it set better, making slicing easier.
Best Side Dishes for Reese’s Peanut Butter Earthquake Cake
Pairing side dishes with your Reese’s Peanut Butter Earthquake Cake can create a well-rounded dessert experience. Here are some excellent options:
- Fresh Fruit Salad: A mix of seasonal fruits provides a refreshing contrast to the rich cake flavors.
- Chocolate Mousse: This light and airy dessert complements the dense cake while adding another layer of chocolate goodness.
- Creamy Cheesecake Bites: These mini cheesecakes offer a rich and tangy contrast that pairs beautifully with chocolate.
- Vanilla Pudding Cups: Smooth vanilla pudding adds creaminess, balancing the textures in your dessert spread.
- Peanut Butter Cookies: For peanut butter lovers, these cookies echo the flavors of the cake while providing a different texture.
- Coffee or Espresso: A warm cup enhances dessert time by balancing sweetness with its bold flavor profile.
Common Mistakes to Avoid
Baking can be tricky, especially with recipes like Reese’s Peanut Butter Earthquake Cake. Here are some common mistakes and how to avoid them.
- Skipping the greasing step: Not greasing your baking dish can lead to a stuck cake. Always grease your dish well to ensure easy removal.
- Not following the mixing order: Mixing ingredients in the wrong order can affect texture. Always follow the recipe steps to ensure proper blending.
- Overmixing the batter: Overmixing can make the cake tough. Mix just until combined for a light and fluffy texture.
- Ignoring baking time: Each oven is different; don’t rely solely on time. Check for doneness by inserting a toothpick and looking for moist crumbs.
- Serving too soon: Cutting into the cake while it’s still hot can cause it to crumble. Let it cool slightly before serving for better slices.

Storage & Reheating Instructions
Refrigerator Storage
- Store in an airtight container for up to 5 days.
- Allow the cake to cool completely before sealing.
Freezing Reese’s Peanut Butter Earthquake Cake
- Wrap individual slices in plastic wrap and place in a freezer-safe bag.
- Can be frozen for up to 3 months.
Reheating Reese’s Peanut Butter Earthquake Cake
- Oven: Preheat to 350°F (175°C) and heat slices for about 10-15 minutes.
- Microwave: Heat individual slices for 20-30 seconds until warm.
- Stovetop: Place slices in a pan over low heat, cover, and warm gently.
Frequently Asked Questions
Here are some common questions about Reese’s Peanut Butter Earthquake Cake.
What makes Reese’s Peanut Butter Earthquake Cake special?
Reese’s Peanut Butter Earthquake Cake features layers of rich chocolate cake with a gooey peanut butter center, making it a decadent treat perfect for any occasion.
Can I make this cake ahead of time?
Yes, you can prepare the cake one day in advance. Just store it properly, and it will taste delicious even after resting overnight.
What should I serve with Reese’s Peanut Butter Earthquake Cake?
This cake pairs well with vanilla ice cream or whipped cream, adding a delightful contrast to its rich flavors.
How do I customize Reese’s Peanut Butter Earthquake Cake?
Feel free to add nuts or other candy toppings based on your preferences! You can also experiment with different types of chocolate cake mix.
Final Thoughts
Reese’s Peanut Butter Earthquake Cake is not just an indulgent dessert; it’s versatile enough for various occasions. Whether enjoyed warm or at room temperature, its rich flavors make it irresistible. Don’t hesitate to customize it with your favorite toppings!
Reese’s Peanut Butter Earthquake Cake
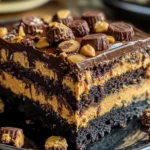
Indulge in the delightful Reese’s Peanut Butter Earthquake Cake, a decadent dessert that brings together the perfect harmony of rich chocolate and creamy peanut butter. This cake is not only visually appealing with its gooey layered center but also bursting with flavor, thanks to the generous topping of chopped Reese’s cups. Whether it’s a birthday celebration, family gathering, or simply a sweet craving, this cake is sure to impress everyone at your table. Easy to make and pleasing to all ages, each bite offers a unique taste experience that will leave you wanting more.
- Prep Time: 20 minutes
- Cook Time: 40 minutes
- Total Time: 1 hour
- Yield: Approximately 12 servings 1x
- Category: Dessert
- Method: Baking
- Cuisine: American
Ingredients
- 1 box chocolate cake mix
- 1 cup water
- 1/2 cup vegetable oil
- 3 large eggs
- 1 cup creamy peanut butter
- 8 oz cream cheese, softened
- 1/2 cup unsalted butter, melted
- 4 cups powdered sugar
- 1 tsp vanilla extract
- 1 cup chopped Reese’s Peanut Butter Cups
Instructions
- Preheat your oven to 350°F (175°C) and grease a 9×13-inch baking dish.
- In a large bowl, combine the chocolate cake mix, water, vegetable oil, and eggs until well mixed. Pour the batter into the prepared dish.
- In another bowl, blend the creamy peanut butter, softened cream cheese, melted butter, powdered sugar, and vanilla extract until smooth.
- Drop spoonfuls of the peanut butter mixture over the cake batter and gently swirl with a knife.
- Sprinkle chopped Reese’s Peanut Butter Cups on top.
- Bake for approximately 35-40 minutes or until a toothpick inserted comes out mostly clean.
- Allow cooling slightly before serving.
Nutrition
- Serving Size: 1 slice (95g)
- Calories: 360
- Sugar: 36g
- Sodium: 290mg
- Fat: 18g
- Saturated Fat: 7g
- Unsaturated Fat: 10g
- Trans Fat: 0g
- Carbohydrates: 47g
- Fiber: 2g
- Protein: 6g
- Cholesterol: 50mg
![Chocolate chip edible cookie dough for one [3 variations]](https://allcrockpots.com/wp-content/uploads/2026/01/Chocolate_chip_edible_cookie_dough_for_one_3_variations_1-768x768.webp)